Understanding the Linux Boot Process in Easy Steps
Understanding the Linux Boot Process is one of the basic requirements for a System Administrator. But before we dive into it, let’s first have a look at what is an operating system. The operating system is the software application that manages the hardware and hardware resources associated with your computer.
In simple words, an operating system manages the communication between hardware and software associated with your computer. Having a basic understanding of any of the available operating systems like Linux, Windows, or MAC, is very important if you want to become a system administrator.
Linux is the most popular operating system in the IT industry. There are many features of Linux which attract the IT giants to use Linux for the servers. In today’s global IT market, there are many IT companies looking for Linux Programmers, Linux Administrator, Linux Engineers, etc, to manage their servers. Therefore, learning an operating system like Linux or any of its distribution will be an addon.
In this article, we will be covering the Linux Boot Process. We will be explaining this step-by-step, so that you may understand the exact process, as in, what are the ongoing simultaneous processes when your Linux Operating System Boots or when you turn on the Linux Operating System.
Introduction To Linux Boot Process
The boot process, in the computer language, refers to the process that takes place when your computer is turned on. When you turn on your computer, the processor tries to find the instructions in the system and runs or executes them. It’s a kind of Wake-Up call for the internal hardware which instructs them to look for the boot device.
We can initiate the Boot Process in 2 ways:
- If you turn off the power and turn it back on, it will trigger the Boot Process
- If the computer is already running some program and the logged-in user initiates a reboot through GUI or command line. This will first shut down the machine and then restart it, initiating the Boot Process.
The above mentions 2 points are only the ways with which you can boot your computer. But within this boot process, there are several steps that are not visible to all. Having a better understanding of these steps will help a system administrator to troubleshoot the problems which might occur during the system boot. Let’s now have a look at the Linux Boot Process in detail.
Linux Boot Process Step by Step
In some ways, Linux boot process is surprisingly very simple. There are 6 stages of Linux Boot Process. The six stages are listed as below:
- Basic Input Output System or BIOS
- Master Boot Record or MBR
- GNU Grand Unified Bootloader or GRUB
- Kernel
- init or initrd
- Runlevel
We will understand each of these stages in detail for better understanding. Having a clear understanding of the Linux Boot Process will help you to identify and troubleshoot various OS-level errors. Now let us learn more about the 6 stages of the Linux Boot Process.
Stage 1 – BIOS – Basic Input Output System
BIOS is the first step in the Linux Boot Process. As the name suggests it checks the input and output devices and then loads the next stage of the boot process. BIOS runs as soon as you power on your computer. It then starts an integrity check on the HDD and related hardware devices. In these integrity checks, BIOS identifies if there are any hardware failures or any hardware errors. This process is the POST i.e. Power On Self Test.
After successful Power On Self Test, the BIOS checks for the available bootable devices. The bootable devices might be Hard Disk, CD/DVD-ROM, Floppy Drive, Memory Stick, etc. After identifying the boot loader device, BIOS loads and executes the boot loader program.
It performs certain integrity checks to determine the list of Bootable devices available in the system. The bootable devices might be Hard Disk, CD/DVD-ROM, Floppy Drive, Memory Stick, etc. it selects a bootable device out of the above devices to load and execute the Boot Loader program. This Boot Loader Program is the Master Boot Record which initializes the second stage of the Linux Boot Process. This program loads in the memory.
Stage 2 – MBR – Master Boot Record
MBR in Linux Boot Process stands for Master Boot Record. MBR is located in the 1st sector of any hard disk. It holds the information on how and where an operating system is located so that it can load into the main storage or RAM. Depending on the hardware the default location of the MBR is below:
/dev/sda
or
/dev/hda
As mentioned earlier, BIOS checks for MBR and loads it in the memory. The size of the Master Boot Record is less than 512 bytes. There are 3 main components of Master Boot Record:
- Information of Primary boot loader in the first 446 bytes.
- Information on the Partition table in the second 64 bytes.
- MBR validation check information in the last 2 bytes
The Master Boot Record loads and executes the GRUB boot loader which initializes the 3rd stage of Linux Boot Process.
Stage 3 of Linux Boot Process – GRUB – Grand Unified Boot Loader
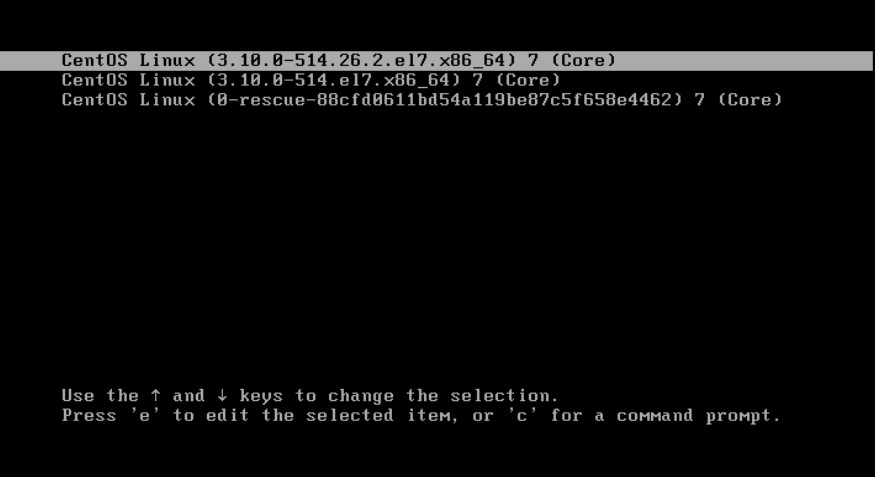
GRUB stands for Grand Unified Boot Loader. It is a boot loader program for Linux systems. GRUB is the first screen that appears on the computer when you turn on the computer. If there are multiple kernel images on your computer, then you will get the screen to select the kernel on which you want to work on. Also, if you do not select any kernel then after few seconds it will select automatically the default kernel. If only one kernel is there, then it will proceed automatically by selecting the default kernel.
GRUB is the first program that runs after you turn on your computer. GRUB basically loads the kernel image and after selecting the kernel image, it initializes the next boot sequence of the Linux boot process which Kernel. The kernel is the central part of the Linux Operating System. GRUB configuration file contains information on the kernel image. Grub also contains the information on the filesystems which are available on the operating system.
The location of the kernel can be found at the below path:
/boot/grub/grub.conf
The sample GRUB program which appears in Linux CentOS distribution.
#boot=/dev/sda
default=0
timeout=5
splashimage=(hd0,0)/boot/grub/splash.xpm.gz
hiddenmenu
title CentOS (2.6.18-194.el5PAE)
root (hd0,0)
kernel /boot/vmlinuz-2.6.18-194.el5PAE ro root=LABEL=/
initrd /boot/initrd-2.6.18-194.el5PAE.img

MBR locates the operating system on the hard drive and informs Linux Loader (LILO). If there are any modifications to the Linux Loader configuration file then update the MBR manually. In the case of GRUB, it reads directly from the/boot/grub/grub.conf.
After Grub loads in memory, it becomes the 2nd stage of the loader. The second stage of the loader resides on MBR and /boot partition.
Kernel
The kernel is the central part of the Linux Operating System. It controls everything on your computer. Kernel loads execute the kernel image and mount the root filesystem on the path specified in GRUB configuration file. Post that it executes the /sbin/init program. init is the first program that runs on the Linux machine and hence the process id is 1.
RAMDISK is a reserved space on RAM. Grub organizes RAMDISK for initrd which is the initial ram drive (initrd.img). initrd is the pre-built modules of most of the drivers in Linux which stores information on additional modules. Once kernel boots, it creates the ramdrive and loads the initrd.img and related dependent modules. The GRUB interface loads from the location /boot/grub/grub.conf. Once kernel loads its modules, the process hands over to the init process. The kernel image has a collection of small, unpacked program that un-compresses the kernel and runs it.
initrd is the temporary placeholder for the kernel. It allows having quick access to the modules which are essential to start the system including device drivers. Nowadays, initramfs (initial RAM Filesystem) is there, which is the successor of initrd (initial RAM Disk). So the image file is located under /boot and is know as initramfs. This temporary root filesystem also contains required Drivers which help to access the partitions and other hardware.
INIT
The first process that starts on the Linux machine is “init“. Because it is the first process, therefore, the process id i.e. PID for init is 1. ‘init’ process creates processes from the script stored at /etc/inittab. It then sets the path, starts swapping, checks the file systems, and so on
Init reads the initialization file located in /etc/inittab and decides the Run Level during the Linux Boot Process. It identifies the default run level from the /etc/inittab file and uses it to load all the required programs. You can verify by running the command “grep initidefault /etc/inittab” which will show the default run-level.
- 0 – halt
- 1 – single-user mode
- 2 – Multiuser, without NFS
- 3 – Full multiuser mode
- 4 – unused
- 5 – X11
- 6 – reboot
Run Level
A run level is a configuration of processes. All UNIX-like systems can run in different process configurations. When the Linux system is booting up, you might see various services getting started. These are the run-level programs which are executed from the run-level directory.
As shown above, there are 6 run-levels in Linux, out of which one is selected by the init program to start the system in the selected mode. Init first finds the default run-level of the system so that it could run the start script corresponding to the default run-level. The location of these run-levels are specified as below:
- 0 – /etc/rc.d/rc0.d/
- 1 – /etc/rc.d/rc1.d/
- 2 – /etc/rc.d/rc2.d/
- 3 – /etc/rc.d/rc3.d/
- 4 – /etc/rc.d/rc4.d/
- 5 – /etc/rc.d/rc5.d/
- 6 – /etc/rc.d/rc6.d/
At /etc/rc.d directory there will be either a set of files named rc.0, rc.1, rc.2, rc.3, rc.4, rc.5 and rc.6, or a set of directories named rc0.d, rc1.d, rc2.d, rc3.d, rc4.d, rc5.d and rc6.d.
RUN-LEVELS IN BRIEF:
- 0 – System halt i.e. the system can safely be powered off with no activity.
- 1 – single-user mode.
- 2 – Multiple user mode with no NFS (Network File System).
- 3 – Multiple user mode under the command-line interface.
- 4 – User-defined.
- 5 – Multiple user mode under GUI (graphical user interface) and this is the standard run-level for most of the LINUX based systems.
- 6 – Reboot which is used to restart the system.
If you want to get into trouble, you can set the default run level to 0 or 6 and as mentioned above, run level 5 is the standard for most Linux-based systems.
The default run-level for a system is specified in /etc/initab file which will have an entry id : 3 : initdefault if the default run-level is set to 3
init is the program used for altering the run level which can be called using telinit command.
It will require to be logged in as Superuser to change the default run-level as a normal user does not have permission to execute this. So the command would be:
sudo telinit 5
This will change the default run-level of a system to 5, i.e. Multiple user mode with GUI.
You may change the root password by booting the Linux system in run-level 1, which is Single User Mode.
Conclusion
We have tried to cover the complete Linux Boot Process in this article and have tried to keep it as simple as possible. We are sure this will be very helpful for you to understand the complete Boot Process in Linux and anything which is unclear, you can surely put in the comments at the end of this page so that we may address them. That will surely help us to learn and explore even more in this topic too!

